Ryedale Woodturners Club Demonstration
Steve Fearnley
Thursday 5 October 2023
Snainton Village Hall
Another of our in-house demonstrations, sharing knowledge within the club, and saving on demonstrator travel and fees.
Steve demonstrated his ever expanding collection of Christmas ornaments, mainly turned from yew branches. This year's additions to the range include Christmas tree baubles, an angel, choristers, a choir master, and Santa. Due to the constraint of a two hour demonstration and what was planned to demonstrate, only one of the items (the bauble) was taken through to a finish on the night, Steve instead showing the techniques and tools involved and then using pre-turned models to explain the processes and show the final result.
Christmas decoration kit
This simple item used an Axminster Seasonal Decoration Kit, priced at £2, though with a £5 postage charge. I will order some for the shop, available from November. Essentially a small pen kit, a 7mm hole is drilled through a blank, which can be any scrap offcut - a piece of laburnum was used here. Acrylic would work well. A pen tube is glued inside, then a barrel trimmer is used to bring the blank down to the size of the tube, and to provide a square, flat surface at the ends of the tube.

The wood was mounted on a pen mandrel with bushes either side. Tension is applied by a live mandrel support centre. The piece was turned to shape, ensuring the end widths match the bushings - use abrasive to finish to thickness. Assembly can be done on the lathe. Ideally apply the finish before assembling the ends - friction polish would work well. It is useful to make a couple of wooden studs that fit in the mandrel and live centre, then squeeze the pen together carefully. This avoids metal on metal marking the gold plating.
Choristers
The second project was a choir turned from yew branchwood. This is a development of the hundreds of snowmen turned over the years. Ideally a little bark should be left on the bottom of the choir smock, to show where the wood has come from, but this was forgotten in the demo. Initially a yew log about 2 inches in diameter was turned between centres, but then a spigot was made to hold the piece, so the head could be finished on the lathe. The best yew branches for this work will have plenty of the creamy sap wood, and not much heartwood. The collar (ruff) was textured using a Henry Taylor Decorating Elf (available from Axminster £60). A handy tool with different shaped bits available. Clean off with a wire brush.
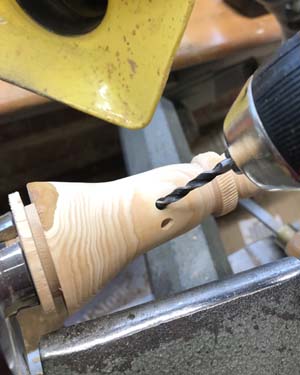
To keep the simplicity of the shape, only hands were added to hold the music, no arms. Two 4mm holes were drilled in the body while it was still held by the spigot on the lathe. Some care is needed to decide where the best position fr the hands should be. Start with the drill bit square to the body, then gradually tilt the drill to about 45 degrees and push. Don't try and drill straight away at the required angle - the bit will slip and damage your work.
[
I need to mention here that some inspiration was taken from Dave Gibbard of Hampshire Woodworkers Association, though his techniques and his choir are different.]
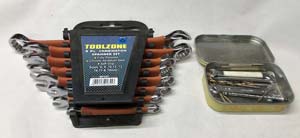
The hands were turned from a 1cm square stick of yew. They were turned to an oval shape about 7mm diameter, and then a 4mm peg was turned at the end. To achieve this accurately, a small spanner was used as a caliper against the parting tool - a set going from 3mm to 5.5mm had been bought from one of the stalls at the Harrogate Woodworking Show.
Instead of trying to turn another hand exactly the same as the first, it is easier to make a batch and then pick a pair.
Part of the hands need to be flat so that they can hold the music sheet. In the workshop this would be done by touching them onto the disc sander, but the lathe can be adapted to act as a disc sander by using a and a sanding arbor. Only light pressure is required and the job is done. (The choirmaster's hands remained round, with one having a 3mm hole drilled through it to hold his baton. )
Jacob's chucks are very versatile and I would say almost essential accessories for the lathe. The one shown here is a keyless version, 1 - 13mm jaw capacity, from RDG tools, £50. A keyed version is available for about £30.
If you are turning pegs or dowels to fit in holes, spanners can be used to judge the thickness quite accurately. A 6, 8 or 10mm spanner is good for sizing pegs to go in holes drilled with standard bits. Smaller spanners can be bought for smaller drill sizes - I think I found one with 3, 3.5, 4, 4.5, 5, 5.5mm.
The music sheet for the chorister was made from oak veneer. Veneer sheet can be cut with scissors. The back was then scored down the "spine" with a Stanley knife, and the sheet bent slightly to make a small book shape. Two staves of music were pyrographed on this - actually God Rest Ye Merry Gentlemen - and it was then sealed with cellulose sanding sealer, positioned carefully on the hands and glued on. All this needs to be done after the wax finish is applied to the body.
The choirmaster's music stand and score was not part of the evening's demonstration, but the music was pyrographed on a sycamore booklet, and to Elaine's delight, it had the correct key signature which was missing from the chorister's sheets - (one sharp for E minor).
Angel
Another adaptation of the original snowmen led to the creation of this angel. The body is much the same as the chorister, but with a more oval head, and definitely no face ( a unanimous vote in response to my bulletin request to choose - from Malcolm). A 10mm hole was drilled at an angle in the back, to take the wings.
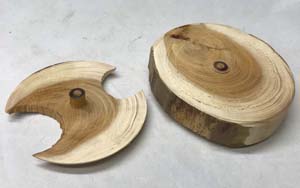
A circle was turned at the end of a yew log - about 4" in diameter. This was shaped on the outside, and then undercut using a parting tool, leaving a 10mm stem which would become the dowel to attach to the body. A couple of people in the hall suggested the underside could be turned first, then reversed and held on the dowel. (This was obviously a better option once pointed out - thank you. I think I had the same idea after making the first angel - but that was back in May, and I forgot.) The holes at the top and bottom of the wings were cut on a bandsaw - nibbled away then smoothed with abrasive. Early attempts involved cutting the holes first using a Forstner bit, before turning, but given how thin the wings are and the direction of the grain, the whole thing vibrates and it exploded on two attempts. Quite spectacular, but not to be demostrated.
Street lamps
Being Christmas decorations, the choir was going to gather and sing carols in the street, underneath a street lamp. The lamps do light up - LEDs were used, attached to a battery and switch at the base of the lamp. To make the hollow stem of the light strong enough, pen making techniques were used, with 2 standard (slimline) 7mm pen tubes inserted in the stem. Three versions were developed: one used four struts made from 3mm bamboo skewers, the lamp base and top drilled to take these; one used a glass sphere with a 5mm hole in the base - found on a craft supplies site online - with a 5mm LED used again; the third used an LED chain stuffed into the glass ball, with a different base to hold a different type of battery holder. The one on the right proved to be the audience favourite.

The single LED lights were sourced from a tea-light, deconstructed with the LED detached and connected via the tube to the battery and switch unit in the base, using wire strands from a USB cable. The base of the lamp was made to house the battery and switch, and a couple of dabs of CA glue held it in place. The battery can be replaced as if it was the original tea-light. Tips on soldering and lessons on serial and parallel wiring were much appreciated at break time.
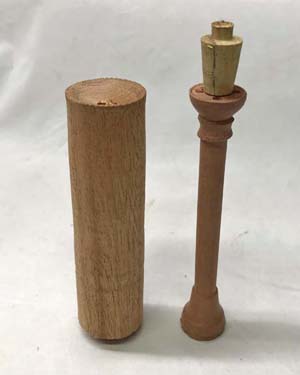
Sapele was used to make the street lamp, at least during trials. It has good even grain, and plenty of offcuts were available. When finished it was sprayed with ebonising lacquer. Ideally it would be made from African blackwood, but this is expensive to be playing around with, so only to be used for a "final product". The blank was mounted between centres, turned to round, a spigot cut, then held in small chuck jaws so a hole could be drilled through. A long (150mm) 7mm drillbit had to be bought for the purpose (online). It is highly unlikely such a long hole will be perfectly centred, as was the case on the demonstration. This means the lamp profile should then be turned as if turning a pen blank - tubes inserted and held on a mandrel - to avoid the chance of going through the thin wall (thanks for the reminder from someone in the audience!) A small plug had been made to fit in the top, used to get the correct angle for the struts in that version of the lamps. For the glass ball versions, a cup had to be turned in the top of the stem - very carefully, being so far away from the chuck on a thin piece.
Santa Claus
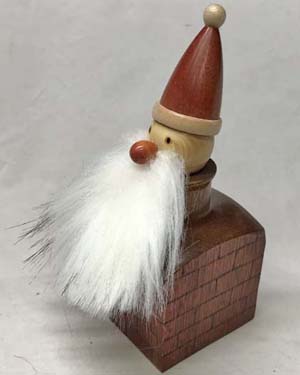
Santa did make a very brief visit at the end of the evening. The chimney is a block of sapele, with pyrographed bricks and stained with some Chestnut red stain. A chimney pot was turned on top. Santa's head was turned from yew, as was his nose, but this was stained red. His hat was sapele stained red, the fur trim and bobble are sycamore. The nose and bobble are pegs, made in the same way as the hands on the chorister. The beard is faux fur, from a pack that Emma Cook (Tiny Turner) sells for £10. The chimney was really a way of not having to decide on a body shape, with arms, hands, fur trim and all that awkward detail. One day ...